|
Hensoldt 4x24 scopes for Heckler &
Koch G3 rifles.
After the German Bundeswehr replaced the G3 with the G36
as their standard rifle, the market was flooded with
surplus Hensoldt scopes and STANAG claw mounts. These
scopes are truly high quality optics.
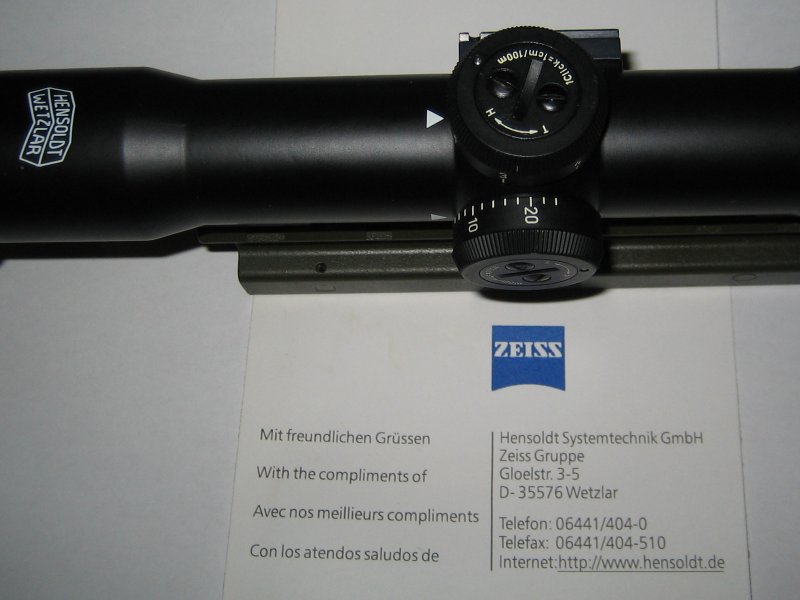
Hensoldt Optische
Werke AG is part of the Zeiss-gruppe. Hensoldt is the
brand name used by Zeiss for their military line of optics.
On a
side note, Hensoldt is not the only supplier of 4x STANAG
interface scopes to the German Bundeswehr, such scopes was
also made by
Schmidt & Bender of Biebertal and
Karl Kaps of
Asslar/Wetzlar. These seem to be rather rare compared
to the Hensoldts.
Most of
these scopes seem to have been delivered with a black
finish, but some was also delivered with an O.D. green
finish. Scopes with a factory finish will always have the
factory name printed on top.
The Hensoldt
4x scopes was made in three different versions. They have
slightly different characteristics.
Model
1.
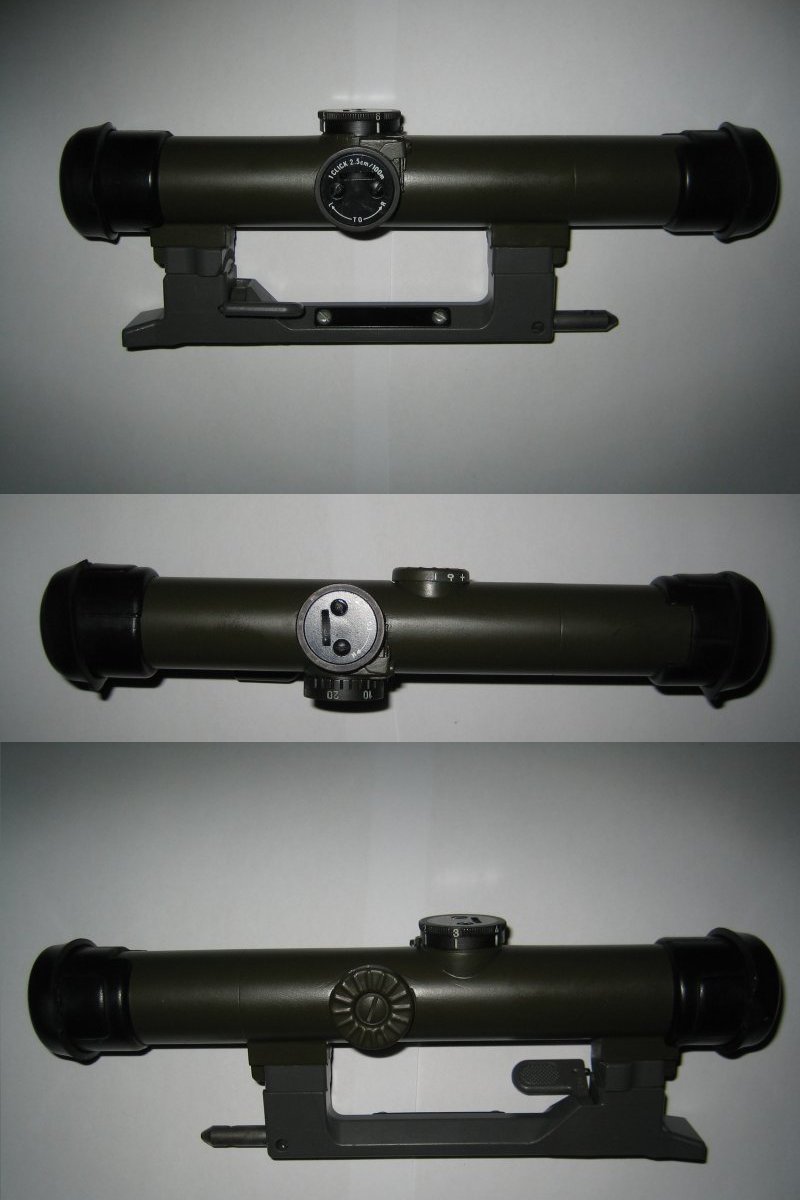
This is the
first version and is recognized in that it has a solid
black reticle, and the reticle can not be illuminated. It
has a focus knob on the right side. The scope has a
straight outline. The windage and elevation turrets does
not have internal "click" adjustments. This particular
scope is attached to a factory SIG 550 series mount. It
has been refinished in O.D. green Duracoat.
Model
2.
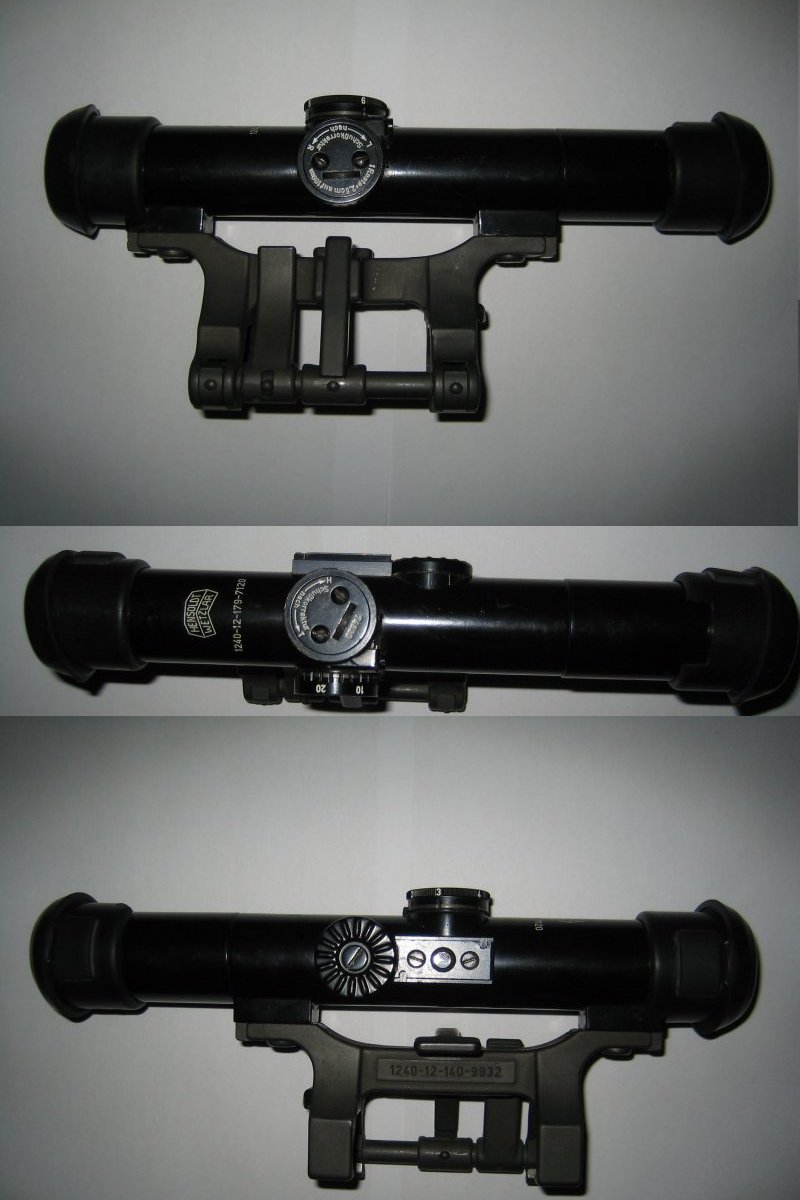
Second
version. This version has a see-through reticle that can
be illuminated. This scope also has a focus knob on the
right side. The illumination attachment rail is found in
front of the focus knob. The scope has a straight
outline. The windage and elevation turrets does not have
internal "click" adjustments. The depicted scope is
attached to a G3 STANAG claw mount.
Model
3.
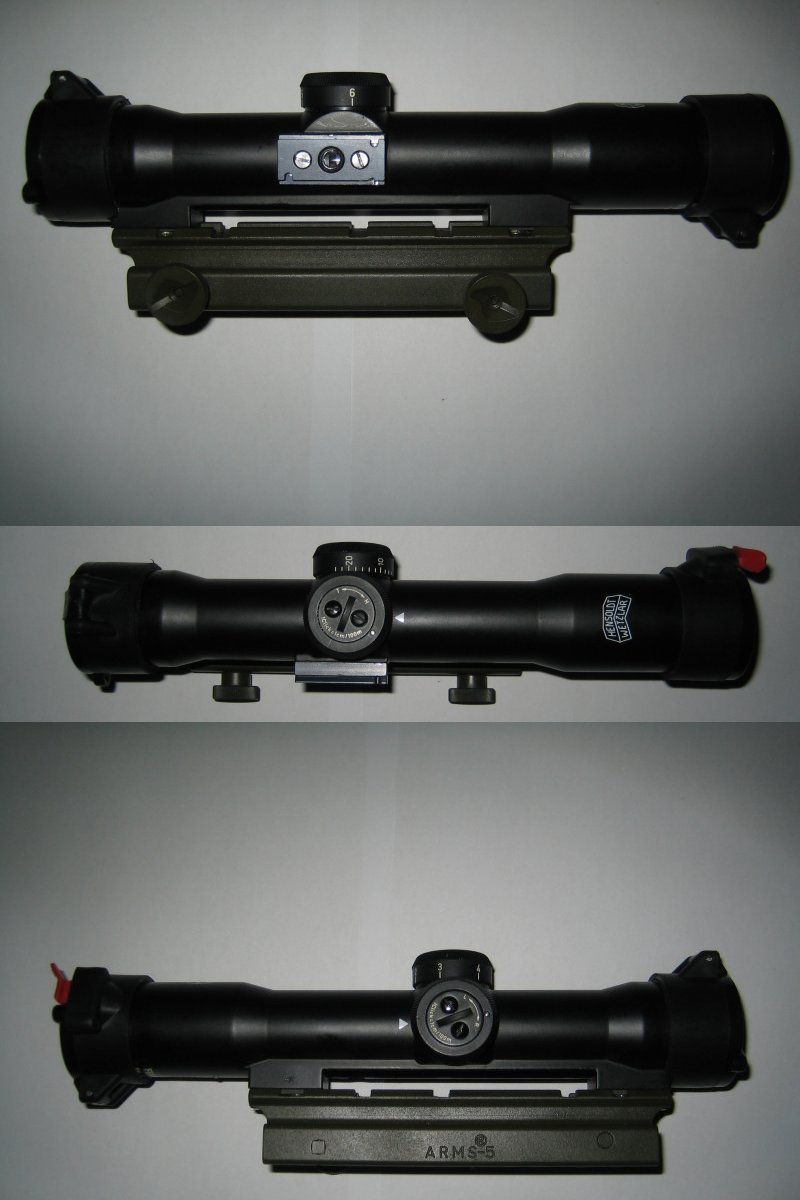
Third
version, known as the FERO-Z 24. It also has a see-through
reticle that can be illuminated. This version has no focus
knob, focus is factory set. The illumination attachment
rail is found on the left side. The windage and elevation
turrets have internal "click" adjustments. The objective
and eyepiece flare out to a larger diameter than the scope
tube. The depicted scope is attached to an A.R.M.S. no. 5
mount.
The rubber
lens covers are to be flipped inside out to remain open.
Sometimes these are old and brittle and need to be
replaced. Spares are available from online vendors, or
they can be replaced by aftermarket covers like Butler
Creek.
All three
versions has a bullet drop compensator for 7.62x51 NATO
ammo marked with the numbers 1 thru 6, indicating distance
in hundreds of meters. A .223/5.56x45 NATO and a 9x19 mm
bullet drop compensated version of the FERO-Z is also
available. The BDC ring of this version is marked .223 or
9mm.
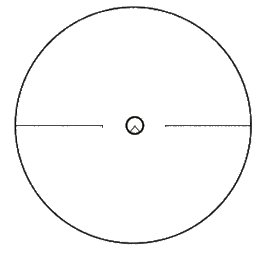
Reticle
The reticle
is graded in mils like in mildot. 1 mil = 1 meter @ a
distance of 1000 meters. This mean that 1 mil = 10 cm @ a
distance of 100 meters.
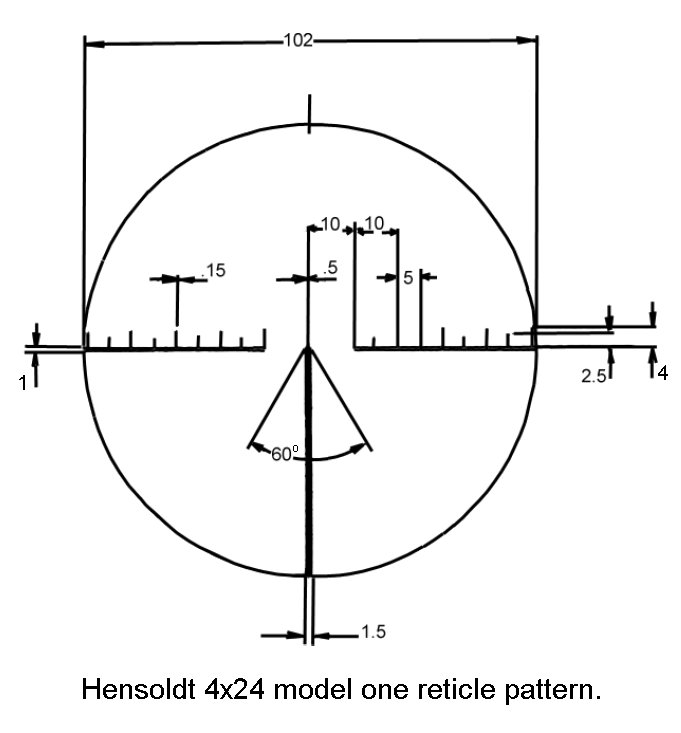
As seen in the above pic, the field of view (FOV) of the
M1 and M2 scopes are 102 meters @ 100 meters distance, or
10.2 meters @ 100 meters distance.
The FOV of
the FERO-Z is 106 meters @ 1000 meters distance. This
equals a FOV of 106 mils.

Using the
reticle for ranging
An IPSC target is 45 cm or 18" wide. This equals the
average shoulder/chest width of a normally built man. If
an IPSC target fits between the posts like seen in the
image below, you have approximately the indicated
distances.
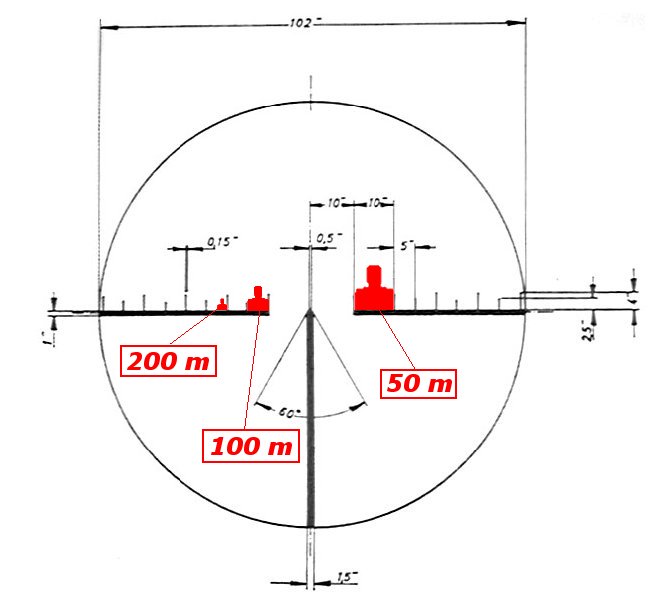
If 100% accuracy is required, there should be some room
between the target and the posts, e.g. if the distance is
100 meters, the distance of 5 mils between two posts is
exactly 50 cm or 20", but for a battle sight at distances
out to 200-300 meters, it's close enough.
Below is a conversion table for ranging.
|
Reticle width in mils |
width @ 100 meters |
width @ 200 meters |
width @ 300 meters |
width @ 400 meters |
width @ 500 meters |
|
0.1 (FERO-Z only) |
1 cm |
2 cm |
3 cm |
4 cm |
5 cm or 2" |
|
0.15 (M1 and M2) |
1.5 cm |
3 cm |
4.5 cm |
6 cm |
7.5 cm or 3" |
|
0.5 |
5 cm or 2" |
10 cm |
15 cm |
20 cm |
25 cm or 10" |
|
1 |
10 cm or 4" |
20 cm |
30 cm |
40 cm |
50 cm or 20" |
|
1.5 |
15 cm or 6" |
30 cm |
45 cm |
60 cm |
75 cm or 30" |
|
2.5 |
25 cm or 10" |
50 cm or 20" |
75 cm |
1 meter or 1.1 yds. |
1.25 meters |
|
4 |
40 cm or 16" |
80 cm |
1.2 meters |
1.6 meters |
2 meters |
|
5 |
50 cm or 20" |
1 meter or 1.1 yds. |
1.5 meters |
2 meters |
2.5 meters |
|
10 |
1 meter or 1.1 yds. |
2 meters or 2.2 yds. |
3 meters or 3.3 yds. |
4 meters or 4.4 yds. |
5 meters or 5.5 yds. |
For reference: 1
meter = appx. 1.1 yard. 1 cm = appx.
0.4"
An example: A
2008 Ford Crown Vic is 78.3" wide w/o mirrors. This is
equal to 199 cm or 1.99 meters.
The car is
facing you squarely and fits between two posts in your
reticle with a 10 mil distance between them.
Q: What is the
distance to the car, and what setting should the elevation
knob of your scope be set to if you where to engage a
target at that distance? It is implied that the
rifle is properly sighted in. Answer is found at the
bottom of the page.
Windage
adjustment
The table below
is the one used by the Swedish Army to adjust for
crosswind. The table is made for the M1 and M2 Hensoldt.
|
Correction for crosswind - Hensoldt 4x24 M1 and M2. 1
click = 2.5 cm @ 100 meters |
|
Range x 100 meters |
1 |
2 |
3 |
4 |
5 |
6 |
|
No. of clicks relative
to wind force |
1 meter/ second or 2.2
mph |
1 |
1 |
1 |
1 |
1 |
2 |
| >
5 meter/ second or 11.2
mph |
3 |
3 |
4 |
4 |
6 |
9 |
SWAG calculations
based on the data for the M1/M2 models in the table above
to suit the FERO-Z
|
Correction for
crosswind - Hensoldt FERO-Z 24. 1 click = 1 cm @ 100
meters |
|
Range x 100 meters |
|
1 |
2 |
3 |
4 |
5 |
6 |
|
No. of clicks relative
to wind force |
1 meter/ second or 2.2
mph |
2 |
2 |
2 |
3 |
3 |
5 |
|
5 meter/ second or 11.2
mph |
7 |
8 |
10 |
11 |
15 |
23 |
Sighting in
/ Windage and elevation zeroing
M1 and M2:
Important
note:
The
elevation adjustment knob is marked T and H. T (Tiefe) =
DOWN. H (Höhe) = UP.
The windage
knob is marked L and R. L (Links) = LEFT. R (Rechts) =
RIGHT.
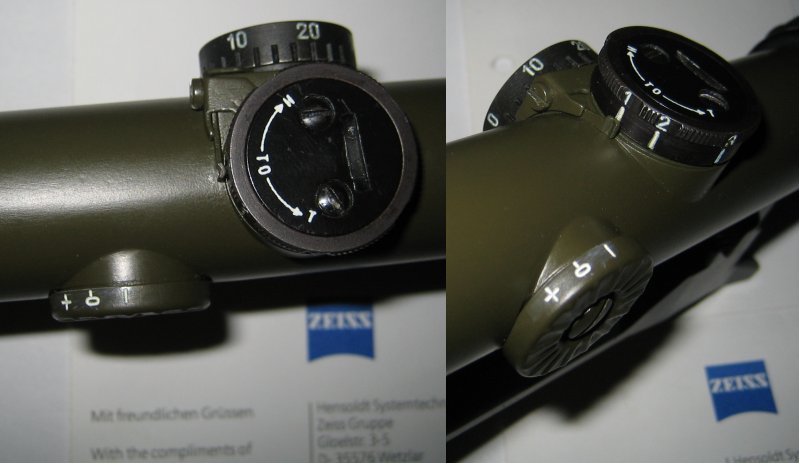
The target knobs work as
follows.
When the screws are tightened, the slotted discs and the
detent ring will move as a single unit, i.e. as an
ordinary target knob. When the screws are loosened, the
slotted disc (the part with the
coin slot) and the detent ring (the part of the knob with
detents and numbers on it) are able to move independently,
i.e. making it possible to zero the sight at e.g. 100
meters as indicated
below.
1.
Make
sure your mount is securely and correct mounted to your rifle. Set
windage and elevation knobs to “0” and “1” respectively.
Place the tip of the reticle post on your target.
2.
Fire one or more shots at
target at a distance of 100 meters/110 yds.
Loosen screws and hold the detent ring with your left thumb and index finger, turn the slotted disc with a coin (held between your
right hand thumb and index finger) in the desired direction. Important! Make sure the knobs (detent rings, actually) don’t move while
adjusting.
Repeat if necessary. The adjusting can be a little tricky as
there is no clicks to count when the screws are loosened.
3.
Tighten screws when sights
are right on the mark.
If you
can't seem to hit the target at all, either decrease the
distance to 30 meters or so and repeat step 1 through 3.
Then move out to a 100 meters again and repeat steps 1
thru 3. Another alternative is to do what the manual
says, aim your rifle using the iron sights set to
"1" and while keeping the rifle perfectly still, move your
eye up to the scope and adjust until the reticle post
points at the exact same spot. For this to actually work,
the rifle would probably have to be attached to some kind
of bench rest. Then fire a few rounds to make the last fine
adjustment.
FERO-Z 24
Important
note:
The
elevation adjustment knob is marked T and H. T (Tiefe) =
DOWN. H (Höhe) = UP.
The windage
knob is marked L and R. L (Links) = LEFT. R (Rechts) =
RIGHT.
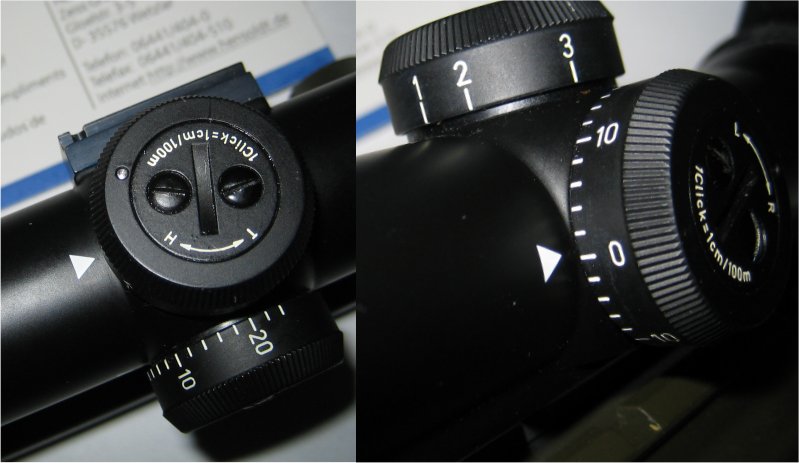
The target knobs work as
follows.
When the screws are tightened, the slotted discs and the outer ring will move as a
single unit, i.e. as an ordinary target knob. When the
screws are loosened, the slotted disc (the part with the coin slot) and
the outer ring (the part of the
knob with numbers on it) are able to move independently,
i.e. making it possible to zero the sight at e.g. 100
meters as indicated
below.
1.
Make
sure your mount is securely and correct mounted to your rifle. Set
windage and elevation knobs to “0” and “1” respectively.
Place the tip of the reticle post on your target.
2.
Fire one or more shots at
target at a distance of 100 meters/110 yds.
Turn the adjustment knobs the desired amount of clicks in
the desired directions. Remember 1 click is 1 cm, or 1" is 2.5 clicks. When your
mean point of impact is dead on, loosen the
screws and hold the slotted disc with a coin (held between your left hand thumb
and index finger), the detent ring with your right
thumb and index finger, then turn
the detent ring with your right thumb and index finger back
to the "0" and "1" setting respectively.
Important! Make sure the slotted disk don’t move
while adjusting the outer ring.
Repeat if necessary.
3.
Tighten screws when the sight is right on the
mark and the outer rings are set to "1" for elevation and
"0" for windage.
If you
can' seem to hit the target at all, either decrease the
distance to 30 meters or so and repeat step 1 through 3.
Then move out to a 100 meters again and repeat steps 1
thru 3. Another alternative is to do what the manual
says, aim your rifle using the iron sights set to
"1" and while keeping the rifle perfectly still, move your
eye up to the scope and adjust until the reticle post
points at the exact same spot. For this to actually work,
the rifle would probably have to be attached to some kind
of bench rest. Then fire a few rounds to make the last fine
adjustment.
BLITS
A similar
scope, Hensoldt BLITS was developed and made in a small
series for the US army. This scope has a proprietary QD
mount which give extensive protection to the scope. The QD
mount was designed for use on flat top M16 rifles, i.e.
picatinny rails. BLITS is an acronym for Beta Lighted
Infantry Telescope System. It has tritium illumination of
the reticle, the reticle itself is a special chevron
type reticle. The BLITS scopes got their first
serious test in Gulf war I. The project halted because of
high unit cost. It's rumored that BLITS scopes are
currently in use in A-stan by US-army SF.
AFAIK, the
ordinary Hensoldt scopes will fit the BLITS QD mount.
These mounts seem to pop up at online auctions, and will
offer your scope additional protection should needed bee.
Various scopes and mounts for reference:
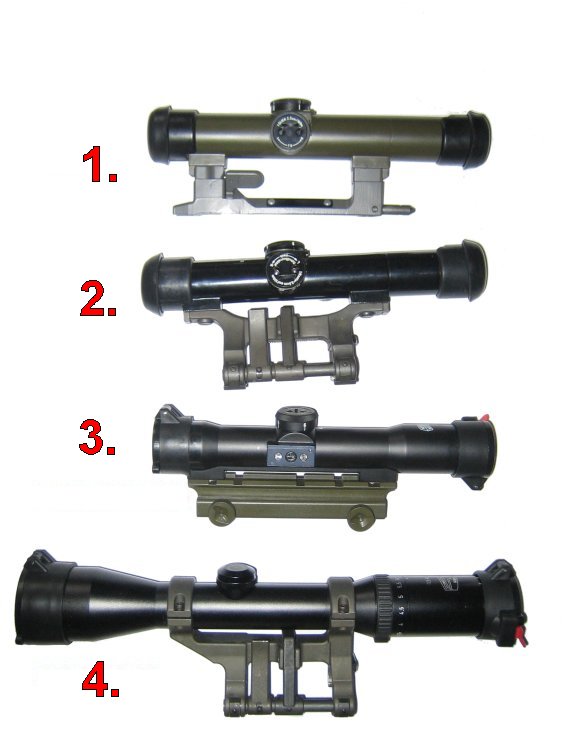
1.
Hensoldt model 1 on a SIG SG 550 series STANAG interface
mount.
2.
Hensoldt model 2 on a HK STANAG interface claw mount.
3.
Hensoldt FERO-Z on an
A.R.M.S.® #05™ Mount.
4.
Schmidt & Bender 1.5-6x42 on a HK claw mount with built in
30 mm rings. These mounts come with 1/2" inserts.
A: The distance
to the car is 200 meters/ 220 yds. The correct elevation
setting would be [2]
|